Client Installation
Downloading the SimStack client
You will require a micromamba (recommended) or conda setup to use simstack. You can use your existing micromamba or conda installation. If you do not have a working micromamba for your architecture please install micromamba, e.g. via the automatic installation route micromamba install docs.
After installing, make sure you have the micromamba or conda command available in your shell and call:
# Create a new environment for the simstack client:
micromamba create --name=simstack -c https://repo.prefix.dev/simstack simstack -c conda-forge
# Activate the environment
micromamba activate simstack
# and run simstack:
simstack
If you want to use your installed simstack client, just open a shell and type:
micromamba activate simstack
# and run simstack:
simstack
Finally, if you want to update an existing simstack install:
micromamba activate simstack
micromamba update simstack -c https://repo.prefix.dev/simstack simstack -c conda-forge
# Or if you need a specific version, example 1.2.5:
micromamba install simstack=1.2.5 -c https://repo.prefix.dev/simstack simstack -c conda-forge
The client version requires passwordless via ssh access to communicate with the HPC. If you do not have passwordless via
ssh access to the HPC resources already preconfigured, you need to generate a ssh keypair and transfer it to your
authorized_keys file of your user account on the available HPC resource. You achieve this with two simple commands,
as shown below.
Warning
Please run the below commands on the same local machine where the SimStack client will be installed.
Installation on Linux and OSX (Arm and x64)
If you don’t have the ssh keys, use the steps below to generate them.
sshkey generation, press enter for the passphrase option.ssh-keygen -t rsaThe ssh-key command generated two keys in the
~/.sshdirectory. Now, you must copy the key to your user account in one of the available HPC resources.id_rsa id_rsa.pubPlease choose the HPC where you want to have passwordless access.
ssh-copy-id <username>@<computer name or IP address>Test the connectivity of your passwordless
sshby running one of the commands below in the Powershell prompt.ssh <username>@<computer name or IP address>After completing the above steps, run the below commands.
micromamba activate simstack
# and run simstack:
simstack
Installation on Windows
You have two options on Windows: You can install either the native Windows version or (in an updated WSL2 environment) the Linux version. WSL2 comes with all client tools required, so this is the recommended approach. If you want to use the Windows version, continue this tutorial.
If you don’t have the ssh keys, use the steps below to generate them.
Ensure the ssh is enabled on your Windows system.
Check if Powershell is installed on your Windows system. If not, you can install it from the Microsoft Store.
To generate a public/private
rsa key pairon Windows, open the Powershell prompt run the below command, and press enter for the passphrase option.ssh-keygenTo copy the
sshkey to your user account on the HPC resource, choose and run one of the commands below in the Powershell prompt. Literally copy the command changing only the user.type $env:USERPROFILE\.ssh\id_rsa.pub | ssh <username>@<computer name or IP address> "cat >> .ssh/authorized_keys"The installation and execution works similar to Linux above:
# Create a new environment for the simstack client:
micromamba create --name=simstack -c https://repo.prefix.dev/simstack simstack -c conda-forge
# Activate the environment
micromamba activate simstack
# and run simstack:
simstack
Testing the connectivity
You can test the connectivity of your passwordless ssh in both systems by running one of the
commands below. You successfully transferred the key if you establish the ssh connectivity to
your HPC without entering your user password.
ssh user@int-nano.int.kit.edu
ssh user@int.bionano.int.kit.edu
Warning
The HPC resource considered here for this tutorial are the int-nano (first line) and bionano
(second line) clusters. Please note that you must replace the user with your user account characters
in the above lines, and here we are considering that you named your public ssh key as id_rsa.pub
located in the .ssh\ directory. This website
has a detailed explanation of how to generate ssh keys on Windows and copy it to your HPC resource.
Simstack Server Configuration
Setup the server by opening the configuration menu:
Configuration->Servers
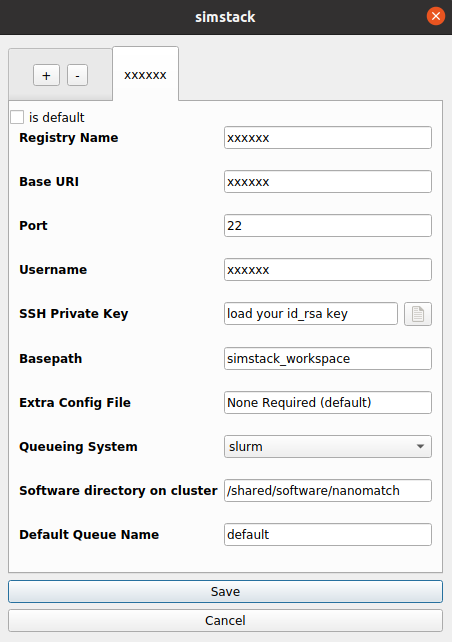
You must replace the characters xxxxxx with your proper setup, as highlighted in the figure above,
and don’t forget to load (SSH Private Key) your ssh key.
Registry Name: accepts any name.
Base URI: can accept any HPC IP, but here we will limit ourselves with one of the below options.
int-bionano.int.kit.edu
int-nano.int.kit.edu
Username: enter the user account according to your available HPC resource.
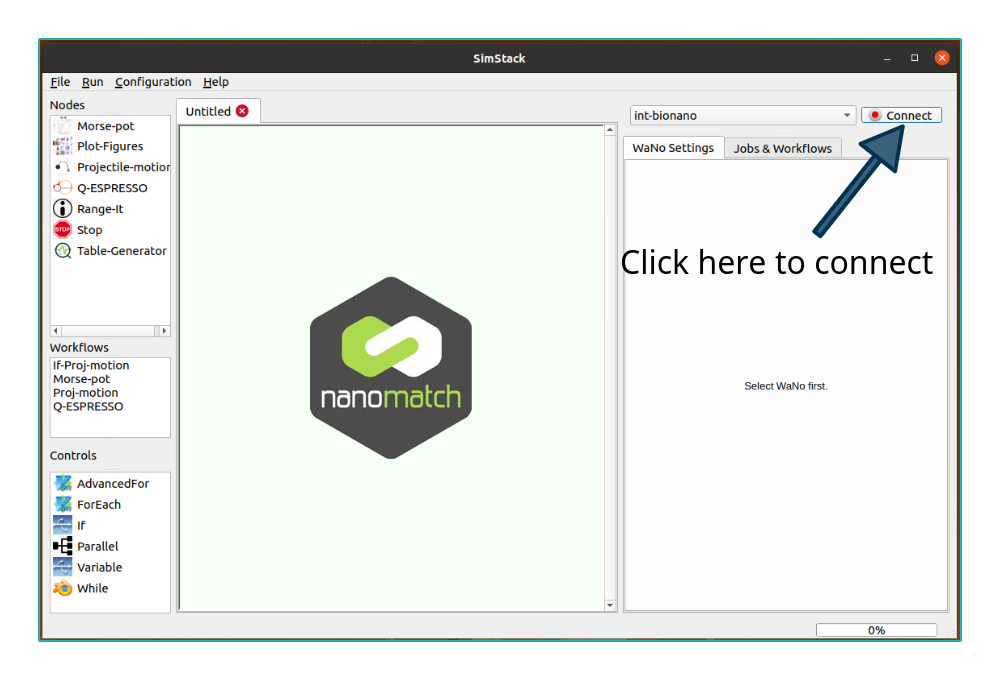
If ssh key is set up correctly, you should now be able to connect by clicking the Connect button at the top right of SimStack. The green button means you successfully connect to the server.
Warning
If you get an error message during your try, double-check the field on the server setup.
Simstack Overview
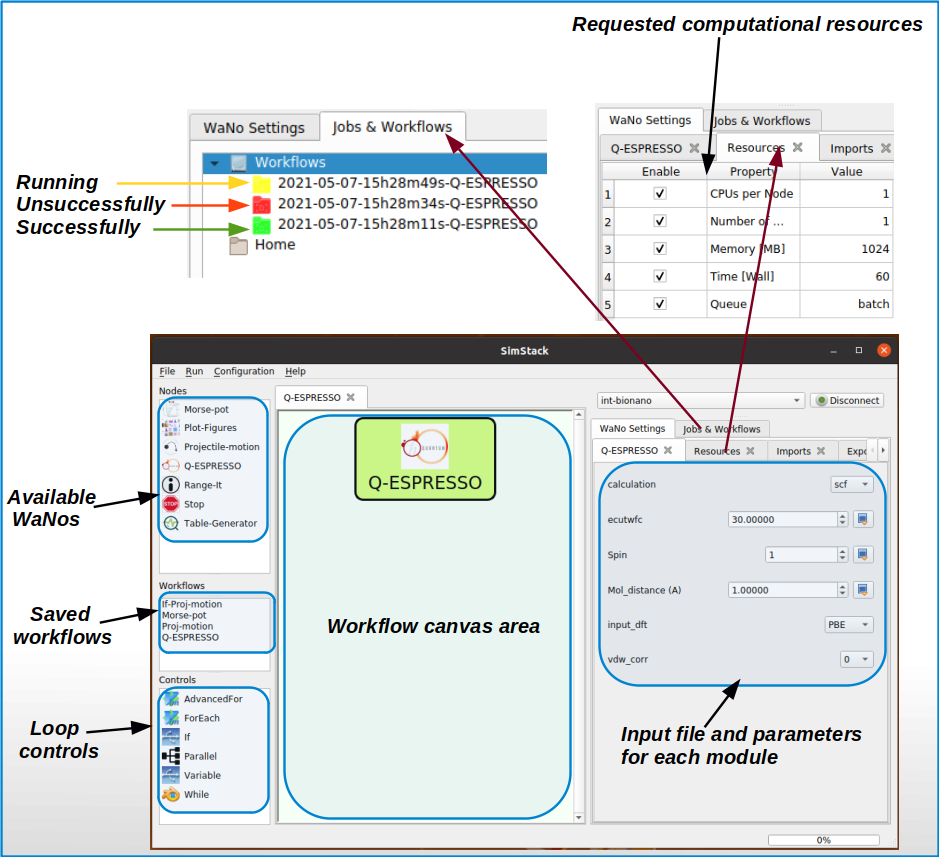
SimStack’s basic graphical user interface elements.
Using the SimStack client (picture above), simulation workflows are constructed by dragging and
dropping various (already incorporated modules) from the window on the left side area (Available WaNos) into
the Workflow canvas area. Double-click each module to modify module-specific parameters (see input file field)
and allocate resources in the Requested computational resources field for each module. To save and reuse your workflow, press ` Crtl+S` or `File -> Save`. It will then appear in the left panel Saved Workflows and can be
re-loaded by double-clicking. To submit your workflow, connect to the computational resource (the connect button shown
in the last figure of Simstack Server Configuration section) and click `Run -> Run` on the menu bar
or `Crtl + r`. All required input files are uploaded automatically to the HPC resource, and workflow modules may
run serially or in parallel, depending on whether your workflow uses or not some of the Loop controls features. The figure above shows that the SimStack client will display a yellow folder while running. When successfully finished,
the client will exhibit a green folder, and you can retrieve all the relevant data from your simulations. If the
simulation presents a computational issue during the execution, SimStack returns a red folder, which we can inspect to fix the problem.