Incorporating a new WaNo
Scientific studies are often obtained by chaining the preparation and execution of multiple interoperable packages one after the other. The scientific process requires the reproducibility of this simulation chain and the reproducibility of the singular modules. Here we show how to incorporate a new WaNo within in SimStack framework, including its Graphical User Interface (GUI), parameters, and execution process.
1. WaNo concept
The Workflow Active Nodes WaNo is specified in an XML file, which SimStack interprets and uses to render
the information of the node from the local machine to the HPC resources. It eases the adjustment of input parameters
and files and is displayed on the right side of the client window, as shown in the last figure of the Installation
section. In the code lines below, we highlight in yellow the five possible fields. The absence of the first one will
not raise any execution error, but the remaining are mandatory for any implemented WaNo.
 1<WaNoTemplate>
 2   <WaNoMeta>
 3      <Author>
 4        <Name> Celso R. C. Rego </Name>
 5        <Email>celsorego@kit.edu</Email>
 6      </Author>
 7
 8      <Description>
 9        This WaNo performs ...
10      </Description>
11
12      <Keyword>Some nice words</Keyword>
13   </WaNoMeta>
14
15   <WaNoRoot name="TemplateWaNo">
16       Load the input files from a given folder
17       Define a set of parameters
18   </WaNoRoot>
19
20   <WaNoExecCommand>
21       Run the simulation
22   </WaNoExecCommand>
23
24   <WaNoInputFiles>
25       Name of the mandatory files, e.g., scripts.
26   </WaNoInputFiles>
27
28   <WaNoOutputFiles>
29       Define the expected output files
30   </WaNoOutputFiles>
31</WaNoTemplate>
Every element is required to have a name attribute. This name cannot contain “.” characters. Below
we give an overview of the meaning for each element inside the WaNoTemplate in the XML file above.
WaNoMetaThis field is dedicated to the developer information and describes the aims of the WaNo.WaNoRootHere is where we define the set of parameters to be exposed and the inputs files of the simulation.WaNoExecCommandThis part is a multiline string, which contains the script or program to execute, when the WaNo starts.WaNoInputFilesThis segment is where we name all static input files, which have to be present in the WaNo folder.WaNoOutputFilesHere is where we name all the expected output files in the output directory. If not present, your WaNo will be shown as aborted (red folder).
2. Morse potential example
In this example, we want to include a python program in a new WaNo. This script computes the Morse potential
\(V(r)=D_{e}[1-e^{-a(r-r_{e})}]^2-D_{e}\) energy of a particular diatomic molecule as a function of the intermolecular distance
\((r-r_{e})\) using Numpy. Here De is the well depth energy relative to the atoms apart from each
other. a controls the width of the potential, \(\color{green}{r_{e}}\) gives the minimum potential distance. This
scrip loads .yml file from where it reads the inputs to compute the Morse potential energy. Via the command line, it is executed as follows:
python/intepretor morse.py
2.1 Starting a new WaNo project
At this point, we want to move from the code line above to a SimStack GUI. To incorporate a new tool, first, we create a new directory with the WaNo name (see the code lines below) in the WaNo repository directory, see Paths configuration in Simstack Server Configuration section. The WaNo name should be unique. In our example, we name it as MORSE-pot.
mkdir Morse-Pot
cd Morse-pot
Next, we create a Morse-pot.xml file, and this will specify the GUI elements in this WaNo. To give our new WaNo an icon image, we may add an image Morse-pot.png directly in the WaNo folder. In such a way, the SimStack client will automatically load this image on the node’s area. Now, we have to consider what aspect in this simulation project we want to emphasize, which parameters should be fixed, which are adjustable. For this particular case, we make all Morse potential parameters flexible. Still, we think of Density Functional Theory, Molecular Dynamics, or Continues model codes, where we have many parameters, which in principle, we are allowed to change. In a scenario of codes with a considerable number of parameters, exposing all of them in most cases is unnecessary and not recommended. In this situation, we should focus only on the most relevant ones for the problems we want to simulate.
The python script here named morse.py accepts arguments to define the Morse potential shape and specify inter-molecular
distance. The outputs are written in the MOROUT.yml file. For more details, see the code lines below.
 1import numpy as np
 2import sys, os, yaml
 3
 4def Vmorse(r,De, a, re):
 5    """Calculate the Morse potential, V(r).
 6    """
 7    return De * (1.0 - np.exp(-a*(r - re)))**2.0 - De
 8
 9
10if __name__ == '__main__':
11
12    with open('rendered_wano.yml') as file:
13        wano_file = yaml.full_load(file)
14
15    decimal_points = 6 # decimal points
16
17    De = wano_file["De (Ry)"] #0.48 #Ry
18    a =  wano_file["a"] #1.8
19    re = wano_file["re (A)"] #0.8 #Angs
20    r = wano_file["Mol_distance (A)"]  #0.4 #Angs
21
22    # get morse potential energy
23    ymorse = Vmorse(r, De, a, re)
24
25    MOROUT = wano_file  # output file
26
27    MOROUT["energy"] = float(round(ymorse,decimal_points))
28    try:
29        with open("MOROUT.yml",'w') as out:
30            yaml.dump(MOROUT, out,default_flow_style=False)
31    except IOError:
32        print("I/O error")
To get this .py file up running and take advantage of the GUI with the chosen parameters highlighted in yellow
below, we must put the script inside the WaNoInputFile tag, lines 31-33.
 1<WaNoTemplate>
 2
 3    <WaNoMeta>
 4 		<Author>
 5  			<Name> Celso R. C. Rego </Name>
 6  			<Email>celsorego@kit.edu</Email>
 7 		</Author>
 8
 9		<Description>
10   			This WaNo perform a plot of Morse potential for H2 molecule.
11 		</Description>
12
13 		<Keyword>Morse-pot</Keyword>
14	</WaNoMeta>
15
16	<WaNoRoot name="MORSE-pot">
17
18	<WaNoFloat name="De (Ry)" description = "The well depth (defined relative to the dissociated atoms)">0.48</WaNoFloat>
19	<WaNoFloat name="a" description = "Controls the width of the potential (the smaller a is, the larger the well)" >1.8</WaNoFloat>
20	<WaNoFloat name="re (A)" description = "The equilibrium bond distance">0.8</WaNoFloat>
21	<WaNoFloat name="Mol_distance (A)" description = "Distance between the atoms" >1.0</WaNoFloat>
22
23	</WaNoRoot>
24
25	<WaNoExecCommand>
26		export NANOVER=V4
27		source $NANOMATCH/$NANOVER/configs/simstack_kit.config
28		python morse.py
29	</WaNoExecCommand>
30
31	<WaNoInputFiles>
32		<WaNoInputFile logical_filename="morse.py">morse.py</WaNoInputFile>
33	</WaNoInputFiles>
34
35	<WaNoOutputFiles>
36		<WaNoOutputFile>MOROUT.yml</WaNoOutputFile>
37	</WaNoOutputFiles>
38</WaNoTemplate>
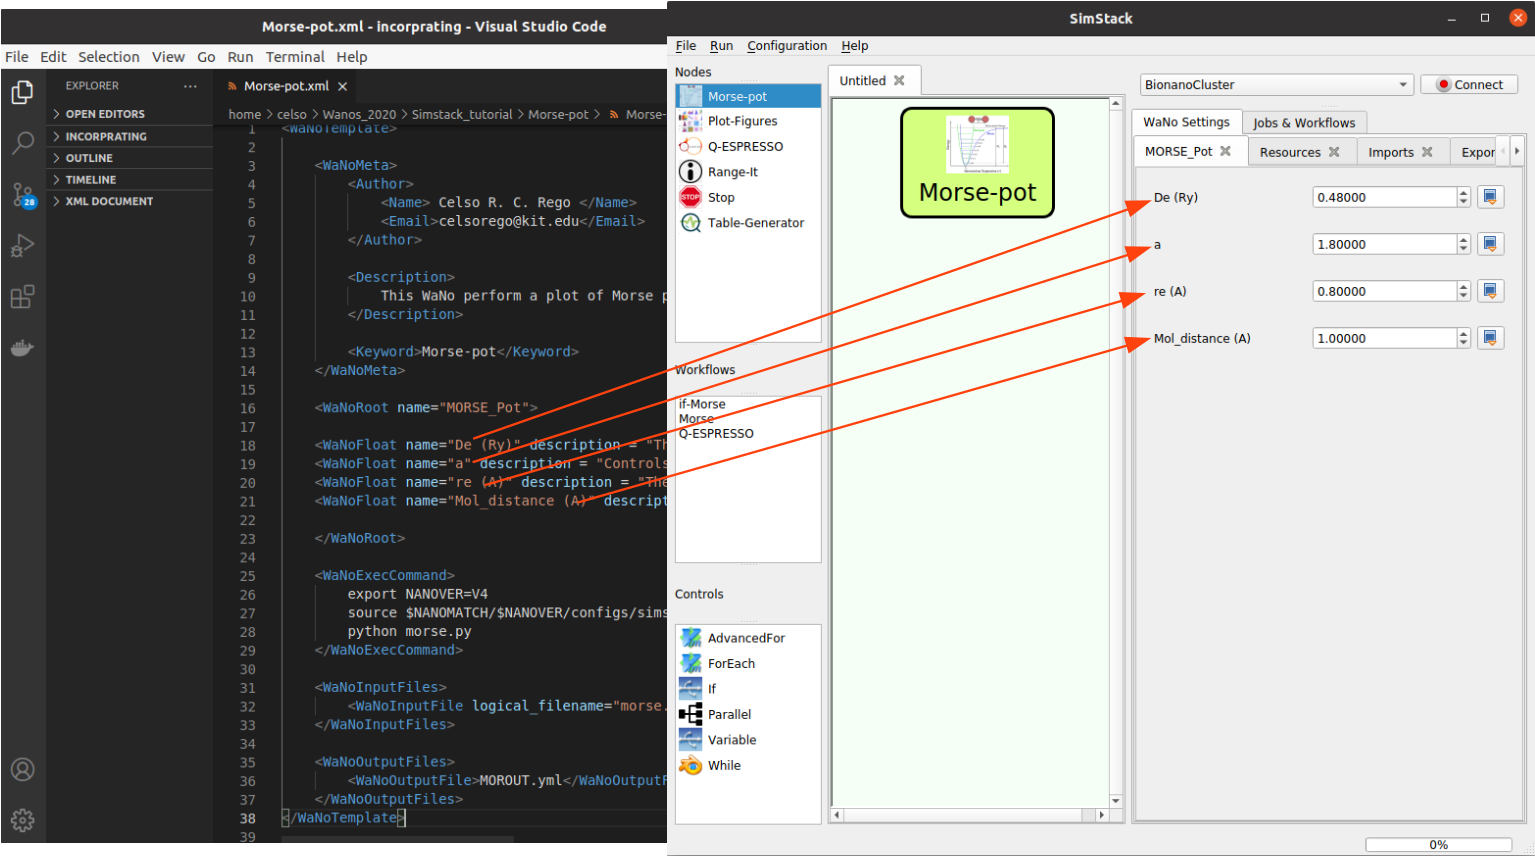
Fig 1 The arrows show the correspondence between the exposed parameter set in the GUI with the .xml tags.
The logical_filename property in line 32 maps out the input file into the file name when transferred to the SimStack server.
As mentioned above,
MOROUT.ymlis the expected output file of the script, and in the.xmlfiles, it is managed by lines 35-37Regarding the adjustable parameters, we add them inside the
WaNoRoottag as shown in Fig 1 and highlighted in the.pyfile.These parameters basically set up the shape of the Morse potential. Every parameter comes with its description.